Tutorial: How to Darn Pointe Shoes
 |
| Finished Pointe Shoes |
I'm gradually getting stronger as I dance more and I would love to start back on pointe sometime in the next few weeks. I'm waiting until after the recital because I want to make sure I don't hurt myself before I have to dance on a super hard floor. I looked at my newest shoes (They are six or seven years old, but they are the newest pair I have) and realized that they needed some love and care and a lot of darning. I still had two layers of darning on part of the toe, but the box was visible near the sole. I decided to make it into a little (but long) picture tutorial, so hopefully you can follow along.
 |
| Shoe on left is the one I am about to darn. Just finished right one. |
 |
| Another view of shoes |
Disclaimer: This is just how I darn my pointe shoes. There are many different ways to do this, but this is the way I like the best. My mom does hers in a completely different manner and they still work just fine at the end of the day. I am right handed, so I hold the shoe in my left hand and work the needle with my right. Flip this if you are left handed. Make sure your teacher allows you to darn your shoes before you attempt. I don't want anyone getting in trouble.
 |
| Shoes, thread, scissors, and needle |
What you need:
Pointe shoes
Darning needle (a large, thick needle that will be able to get through the tough layers of shoe fabric and thread. Can be found at any craft store.)
Light pink cotton crochet thread ( Do NOT get acrylic, nylon, or bamboo. They will be too slippery and you will fall off pointe.)
Thimble (optional, have long hard fingernails that I use to push the needle through the tough places, but a thimble is good if you have weak nails or don't want to chance stabbing yourself under the nail with the blunt end of a needle)
Scissors
 |
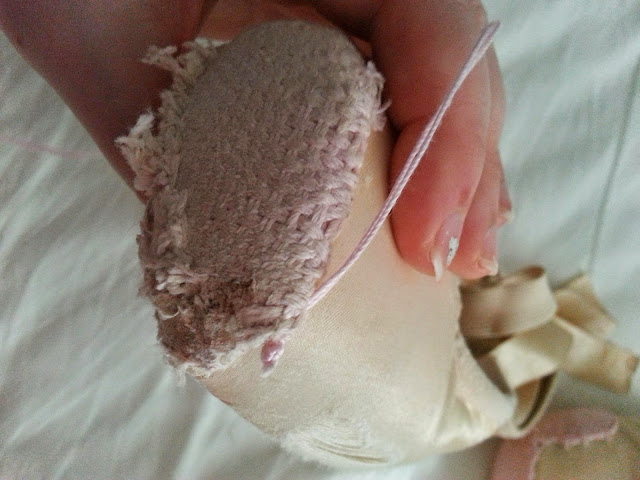
| Where I really need to darn on this shoe. The fabric is gone! |
Step one: Figure out how much darning you need to do. I did just the toe on this shoe, but the other in the pair needed some major work on the side of the box, so I darned there as well.
 |
| Tying the knot |
 |
| The knot. You don't want too much of a tail that will get in the way. |
Step two: Cut a long thread. I measure from my fingertips to opposite shoulder three times. This will give you a very long piece of thread to use so you won't have to keep stopping to start a new bit of thread every few rows. It will tangle if you don't drop and spin the needle between every row to get the twists out of the thread, so be careful and work slowly to avoid this. If you get a knot in your thread, don't jerk or yank on it. Gently untie the knot with your fingernails or with help from the needle. Thread the needle and tie the two ends of the thread together so you have a double strand.
Step three: Start at the upper right corner of the box and sew into the fabric of the shoe, making sure the knot is firmly in place.
 |
| Sewing around previous darning layers |
 |
| Go around the entire toe area |
 |
| Get a good anchor in the corner |
Step four: Going around the outside of the toe, sew a circle. This will be your anchor to help you keep all the darning from moving around.
 |
| Be very careful where there is little fabric to sew your anchors |
 |
| Back to the starting point. You can see the two old layers of darning on the shoe. We are darning over that. |
Tip: The bottom of the shoe will be hard if you don't have any fabric left like I did. Be very careful and gently sew into any remaining scraps of fabric. If you pull too hard, the threads will break.
 |
| Starting the vertical threads |
 |
| Over the bottom anchor, turn around and go back under |
Step five: Once you get back to the starting point, bring the thread back and forth vertically across the toe of the shoe, using the anchor points in your circle. I go over the anchor thread, bring the needle under and across the toe of the shoe and repeat on the other side.
 |
| Finishing the vertical threads |
Tip: Just say "over, under" to yourself constantly and you will be good. Try to keep the threads close together, but not overlapping and keep it slightly loose. If it is too tight, you won't be able to weave back and forth properly later. Also, be careful when you are working with the bottom anchor thread so you don't pull it too hard and rip it out.
 |
| Keep threads close together, not twisted, and not overlapping |
 |
| Make sure it's covering all the bare parts of the box |
When you get to the end it should look like you have a solid, flat bunch of vertical threads covering to toe.
 |
| Begin the horizontal rows. Over the side anchor thread, turn the other way, and under. |
Step six: Bring the thread to the side and bring the needle under the side anchor thread so you can begin the weaving.
 |
| Begin weaving over, under, over, under |
 |
| Try not to twist the threads |
 |
| First row complete! |
Step seven: Weave back and forth across the toe of the shoe, using the anchor threads on the ends to turn around and go the other way. Over, under, over, under. You always want your current stiches to be opposite the stiches in the previous row so that whether you are looking at it right side up or sideways, it is always over, under, over, under.
 |
| Weave several rows "under" first row to make a tight weave |
 |
| It looks messy now, but it will get better! Don't worry! |
Tip: When I start, I always end up leaving too much space between the anchor "row" and my first row of horizontal weaving. To fix this, I go back across the shoe twice Under the first row to make the weave tighter. (see pictures to understand this) You want a tight weave, but not one that is pulling too tight or it will rip your anchor threads out if you don't have too much fabric left on the shoe. The best way to avoid this is to darn your shoes before all the fabric is gone.
 |
| And another row back across |
Tip: Try to keep the thread from twisting as you weave. Jiggle the thread back and forth a little to get it to lay flat. Also, if your stitches are too far apart, push them down gently with your fingernail.
 |
| Over, under, over, under |
 |
| Start back across above the "first" row. Over and under! |
Step eight: When you run out of thread, tie a knot, cut the thread, and repeat step two. Start where you left off and cut any excess thread off the end of your knots.
 |
| Keep doing this for the rest of the shoe |
 |
| This is the end result |
When it is finished it should look like a rather neat weave. You can see in my shoes where the threads twisted a little bit. This won't matter too much. When you use the shoes, the friction between the floor and the shoes combined with your body weight will make the fibers of the threads mush together slightly (see before pictures to get an idea of what I'm talking about).
 |
| The box of the shoe is now covered and protected |
I like to keep my old darning on the shoes under the new darning if I can. You can see some of the threads poking through the new layer. This doesn't matter, they will flatten out over time.
 |
| A neat weave |
I have been darning my shoes like this since I got my first pair when I was thirteen (eleven years). If you do this regularly, your shoes will last longer and you won't have to buy new shoes as often. When I was dancing on pointe regularly (three times a week, barre and some floor work, no turns), I used roughly one pair of shoes a year (with the exception of one pair that died after about three months).
Be careful the first class after you darn them: they will be slightly more slippery than you are used to. You will have very fast turns!
 |
| See where I joined the side section to the toe section? Just wove into the anchors of the older work. |
If you have any questions or comments, please leave them below so I can get back to you. I hope this was helpful!
 |
| It doesn't have to be perfect! Just functional! The shoes are now ready to wear. |
Beautiful needlework! You make it seem so easy! :) I think the pointe shoes look cooler this way; it shows that you are truly dedicated to your art. Hug!
ReplyDeleteCan't you just buy new shoes? That looks ridiculous in addition to being time consuming.
ReplyDelete